Maintaining Smart Parts Ion
By Andrew C. Syren
One of the aspects of choosing your next marker should always be how easy it is to maintain that marker. In reading many of the reviews on the new Smart Parts ION I found that there was little discussed about the topic. So with that I decided to run a little write up on how easy or difficult it is to practice simple maintenance on the Smart Parts ION.
My first impressions of this marker were simple. It was small, lightweight and easy to set up for use. After a good days worth of play however, the ION should, as with any other marker, be put through a basic course of maintenance. Doing so should be relatively easy I thought since this marker is as easy as it was to set up for use. Sadly to say, I was a bit mistaken by this and later found that maintaining the ION is not a user-friendly venture.

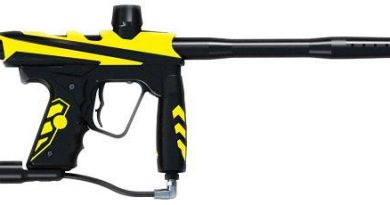
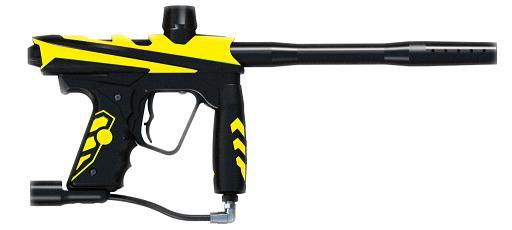
Above we see the ION with the trigger frame and body separated. Be careful of the eye harness and banjo fittings when taking the two halves apart.

Above: The ION’s bolt is located inside the markers firing chamber. Unscrew the breach body (front half) from the firing chamber (back half) to expose the bolt for maintenance.
Starting with the regulator, I separated it from the marker and began following the instructions laid out in the manual. With few pictures to follow I found this to be an adventure that I dare not write home about, but the lack in effort on Smart Parts end to make a decent owner’s manual is another story entirely. With the regulator separated from the body of the gun I then took the rubber sleeve off and proceeded to remove the two small setscrews found within the side of the regulator body. Next, I unscrewed the two halves of the regulator body and found that the internals to the regulator were relatively simple.
The one problem I did have was the fact that you needed a 9/16th deepwel socket to get the spring platform out. Tell me this, how many kids of the age 13 who may very well be a major part of the ION market have a socket set? This was in my opinion a bad idea as it could cause many kids out there to neglect their regulators thus causing many poorly maintained IONS to flood the EBay market place and bring a bad name to the ION itself.
Nevertheless, since I have a 9/16th deepwel socket in hand I went to work. I remove the spring platform and pulled out the spring and regulator piston. From the factory there was very little lube already on the piston so I wiped off the factory lube and put a generous amount of DOW33 (also known as Shocker Lube) on the piston and a slight amount on the outside of the spring to keep the spring from scoring the inner diameter of the regulator body.
Before assembling the regulator, I put a small amount of lube on each of the threaded areas so that as they go back together they would thread with ease. I find that this helps when having to maintain a regulator on a regular basis. With the internals lubed up well and the regulator assembled again I installed it back onto the marker and was set to move onto the bolt of the gun.
The bolt to the ION is a simple spool design found in markers like the Smart Parts Shocker or the high profile Dye DM5. Getting to these particular bolts is relatively easy as they both have access to the bolt through the back of the body. The ION however was a bit trickier as you have to remove the body of the marker to get to the bolt. That is where I found that this marker is neither for the timid nor for those that have no technical sense to work on their markers themselves.
First you need to remove the trigger frame from the main body housing. Doing so is easy by simply removing the Allen screw located in the back, in front of the trigger and the one located in the front of the IONS breach. Separate the frame from the markers body and your set to move on to the bolt right? Wrong. After I removed the trigger frame from the body I had to slightly roll the body away from the frame and expose the two banjo fittings that were attached to the firing chamber of the body. Fortunately my IONS solenoid and circuit board assembly was easy to pull upward which allowed me to expose these banjo fittings enough to get my Allen wrench into the fittings and remove them from the firing chamber. I have heard that the solenoid and circuit board assembly can be tough to remove on some IONS so be careful when doing this yourself.
Once the banjo fittings are removed you will need to remove the wire harness for the anti-chop eye system from the board located in the breach of the marker body. Once that is complete you can now slide the plastic body cover off and expose the internal assembly of the ION. Be careful when sliding the body of the ION off of the internal bolt assembly as the anti-chop eye board and the detents may fall out and get damaged or lost. Take care of these items and place them back in their perspective place when assembling the marker after the maintenance is complete.
Taking both hands, grip the front half of the ION known as the body breach and the back half known as the firing chamber and unscrew them apart from each other. Once undone you will be able to slide the bolt out and perform the maintenance needed. Lube both back o-rings on the bolt with a generous amount of lube after cleaning off the old lube. Again I put a small amount of lube on any threads before assembling the body halves so that in the future they won’t be too hard to get back apart. In reverse of what I have written I then put the ION back together being careful to not pinch the eye harness wires between the trigger frame and body.
In conclusion, I have found that there is more work to maintaining the ION than so described in the manual but that’s not to say that the ION is a bad marker. In fact, the ION is a great marker for the price and will rival any other marker out there in its price range and even some high-end pricier markers. With the concept of having a composite body like the ION, I am sure there was expected flaws or difficulties such as these but in the end the ION is a very competitive piece of equipment. With a reasonable price range the ION is a great buy, even if it is a bit cumbersome to maintain. I can only say that I wish Smart Parts had given the ION manual a bit more thought and a few more descriptive pictures to help guide the user through this maintenance process.
If you wish to read more about the ION you can visit our forums. We have many forum threads helping users with upgrades and maintenance on this marker. Nobody should be left in the dark when it comes to his or her markers up-keep. Sign up now and get the low down on the ION.