Diablo Wrath Review
The Diablo Wrath has become one of the most talked about markers to hit the paintball world in recent months especially considering that it is quite possibly the only true competitor to the recently released Smart Parts Ion. With a price around $260 the Diablo Wrath would appear to be a great buy considering the list of options that come standard. Beam Break Eyes, Clamping Feed Neck, Autococker Style Barrel Threads, Bottom Line ASA, Adjustable Regulator and an Electronic Firing Board with LCD Screen make the Diablo Wrath an appealing choice when looking into buying your next paint slinger.
When I initially picked up the Wrath at TC Paintball here in Grand Rapids I found that the packaging was well put together and very solid. Outfitted with die cut foam boxed in what could double as a carrying case the Diablo Wrath was well protected from the elements. The Barrel was kept tight in it’s own separate compartment and the owners manual and barrel sock were placed on top. All in all the packaging was impressive to say the least.
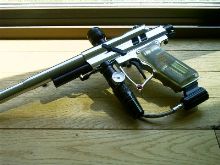
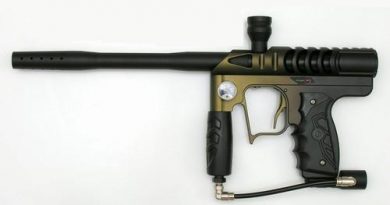
Having inspected the packaging I moved on to the marker itself. I removed the marker from it’s packaging and installed the barrel. Looking over the Wrath I found that the anodizing was pretty smooth and the cuts along the body were nice. There were some pits and imperfections in the trigger frame that might be due to lesser grade aluminum used for production but that is my own personal speculation and may not be true about all Wrath’s released to the market. However, looking over the maker I was somewhat impressed by the look and found that for the dollar amount paid for the Diablo Wrath the marker was satisfactory and could easily pose as a good value based on looks. If the Wrath were to perform as well as it looked it would be a true contender in the fight to become the perfect low cost “high-end” marker.
After carefully inspecting the Wrath I grabbed a fresh battery and the Allen wrench for the grip screws and went to work. Once the fresh battery was installed and the grip was secured I turned to the owner’s manual to study up on the sequence used to turn the marker on. Briefly thumbing through the manual I found that it was lacking in the user-friendly department and could use a few diagrams as to help in any future maintenance. Even the descriptions as to how to operate the marker were poorly explained and might lead the user to much frustration. Upon discovering the method in which was to be used to turn the marker on I went to work. Locating the lower button on the rear of the grip frame I pressed and held it for five seconds. This seemed a bit lengthy, as most markers require around two seconds to turn on or boot up and some even less time. Once the marker was turned on it was automatically in safe mode and simply required that I press the top button on the grip frame to engage for use.
In browsing the manual for any particular options I found that there were a couple things that could be done to the electronics. First being the power saving mode. Assuming that this was to help in saving battery life I turned it to auto and hoped it would then turn the Wrath off when at any time the marker sat idle for a period of time. The manual was unclear about what option between the “auto” setting and the “on” setting did so I had to go with my best guess. Secondly I turned the Eye Sensor setting on and scrolled through the game timer option along with the shot counter. The rate of fire was easy to set up as you simply use the top button on the back of the grip frame to raise the rate within a range of 4 to 20 cycles per second. This can be done even with the marker in live mode so it can easily be adjusted on or off the field.
With the circuit board set the way I felt best I decided to run a small test to the Anti-Chop Eye System. With the marker engaged and the safe mode now turned to live I pulled the trigger. From within the grip frame I heard a small click and wondered if perhaps this was a sound that the marker made while the Eyes were turned on. To be certain of this, I grabbed my tank and screwed it into the marker then placed a barrel sock on the marker for safety. Now with the marker gassed up I gave the trigger a few pulls only to have the marker actually fire. It was my assumption that while in the settings mode, turning the “Sensor” option to the on position this would then turn the Eyes on but it may have been a mistake of mine. Going back into the board settings I turned the Sensor setting to the off position then performed the test again. Again the marker fired which then lead me to believe that the Eyes were not working correctly. And as with any technically inclined paintball player like myself I decided to rip into the problem.
Degassing the marker and removing the barrel, I went to work. I removed the Eye covers and found that the screws that held them in place were slightly cutting into the wires behind the covers that lead to the Eyes. The wires actually were routed around the screw in such a way that there was too much of an opportunity that the screws could cut into the wire and thus ground the Eyes so they would not function. Using a small piece of electrical tap I repaired the wire and gently screwed the cover back onto the body. Then, in performing the test to verify that the Eyes were working I set the Sensor option to the on position and tried to fire the marker. The LED on the back of the trigger frame blinked yellow and there was no audible click as before. I assume that this was the correct fix and decided to move on with the review from there.
With marker in hand I loaded up my Halo-b with the V35 board installed and screwed in my tank. For test I used a 45/4500 Crossfire High Pressure output tank and used PMI premium paintballs. The setup at this point was no heavier than a similar setup using an Impulse or older style Intimidator. It was a bit heavier than the Shocker or Ion but that is to be expected considering the stack tube blow forward design of the Wrath. On a simple note, the blow forward design is a design in such a way that the marker uses a one-way solenoid within the grip frame to push the ram and bolt forward within the lower and upper tubes of the marker. At that point the ram pushes the valve stem in and fires the marker. Then using a spring return the marker reloads another paintball into the chamber and resets the bolt and ram to the backward position ready for the next shot. It is a simple design that enables the marker to achieve higher rates of fire than your typical blow back markers.
Following the instruction manual as best I could, I then prepped the marker for test. I then ran three full hoppers through the marker with zero chops and was impressed by how well the efficiency was. Calculating the air used for the three hoppers shot I found that the marker would run a rate of about 800 shots from the 45/4500 tank I used for test. In testing the marker I found a couple issues I was concerned with.
The first issue being the rate of fire. The trigger on the Wrath seems a bit sloppy and prohibits the user from hitting top rates when fanning or walking the trigger. This was using the stock setup that the trigger is set at from the factory and could use a little tweaking but it still represents a slight issue. Even after setting it up with a tighter, less lengthy pull I still had a hard time hitting anything above eleven balls per second. This could be one of two things, first being the lack of a debounce setting or secondly the lack of enough trigger readings made by the software within the markers electronics. Both possibilities however are not something you can fix without replacing the board entirely.
The second and most frustrating problem for myself was the accuracy. The Wrath comes stock with an aluminum bolt, which causes tremendous kick. Even with a decent paint to barrel match you have to hold tight to compensate for the kick of the marker, which makes it difficult to hit ball on top of ball shots. In essence, the marker was efficient, fairly fast from a new players stand point and with the possibility of upgrading to a delrin bolt the marker could achieve a much better accuracy rating. Also, the shot to shot rating over the chrono showed a steady rate of ± 8 feet per second. Considering that the setup was completely stock and the inline regulator and the low-pressure regulator were not fully broken in the rate over the chrono was very acceptable.
Once I was finished running the Wrath through the testing process and recording my results, I decided to take it to the bench and tear it down for lube. The build of the Wrath is extremely simple considering that it is a blow forward design. The manual tells the user how to clean and lube the bolt but goes into no further detail as to maintain the rest of the marker. Simply put, the manual fails the user again and should be a point of research and development for Diablo. A better manual would increase the chance for success when maintaining such a marker.
Since the manual lacks such help in maintaining the Wrath, I will add a few pointers here. First degas your marker and remove any paint from the Wrath. Then, remove the barrel and begin by pulling up on the bolt pin and sliding the bolt out from the top tube of the maker. Clean the bolt off and set aside. Then with the correct size Allen wrench remove the eye covers and set them aside as well. Be careful of the ball detents so that you do not lose them. If they are in need of replacement now would be a good time to do so. If not, slide them out and place aside. Next remove the trigger frame from the body of the marker. When doing so remove the front LPR hose from the fitting and also from the rear ram hose fitting.
With the eyes free from the body and the two hoses free from their perspective fittings the trigger frame will separate from the body with ease. Other than the eyes and the hoses the only thing holding the trigger frame to the body are the two Allen screws. Once you have done this, remove the ram cap by unscrewing it from the back of the marker. Once removed, slide out the ram and clean it off. Apply some lube to it and slide it back into the marker.
For this review I used DOW33 for the ram and found it to work very well. Now, screw the ram cap back in and install the trigger frame back onto the Wrath. Continue the process until you have completely assembled the marker aside from the bolt. Using a good oil such as Gold Cup or as explained in the owner’s manual, Empire Oil (for this review I used Gold Cup, as it seems to have the best results) put a few drops of oil onto the bolt then slide it back into the top tube of the marker. Once installed, pop the bolt pin into place and your all set. Aside from the front LPR and the Inline Regulators your Wrath has been cared for and will run fine for the next few thousand shots. I recommend that you lube your ram every four to five thousand rounds and your bolt every two thousand.
In conclusion, I’d like to say that the Wrath was packed full of great features that most would consider “upgrades” for nearly any other marker in it’s price range. With standard features such as Beam Break Eyes, Clamping Feed Neck, Autococker Style Barrel Threads, Bottom Line ASA, Adjustable Regulator and an Electronic Firing Board with LCD Screen the Wrath is a great buy. As with any marker the Wrath had it’s down sides but being limited to such cons as a slower rate of fire due to possible program inadequacies, and the bolt being constructed of aluminum the pros outweigh the cons in every way possible. With a few minor upgrades the Wrath could quite possibly be one of the best buys for the new paintball player.


